Search This Blog

Wednesday, April 28, 2010

Crockpot Salsa Chicken

Crockpot Salsa Chicken is the easiest thing EVER and it's super versatile. It was a huge staple for me when I was doing Weight Watchers because it's only 3 points per chicken breast. Even though I don't "follow" WW as closely as I should, I still make it often because my kids like it. You can eat it right out of the crockpot with any type of side.

Or, you can chop up and serve with your favorite salad fixings.

Or, you can add a can of 98% fat free Cream of Chicken soup and make a gravy type topping to put on pasta or rice, although the color isn't all that appetizing.

Or, you can shred the chicken and put it on hoagie buns, melt some cheese on top in the broiler for a yummy sandwich.

Or, you can shred it and make Chicken Barley Chili.

Or, you can shred it and use it to make quesadillas.

Or, you can shred it and use for a base for the Tex Mex Burritos that I made in January.

Or, you can shred and add 1 C frozen corn, a can of black beans, heat for another hour and use it for easy tacos.

That's just a few of the ways I use it.

What you'll need
Package of Boneless Chicken Breast
1 C Salsa ~ I use thick and chunky
1/2 C Water
1 Chicken Bouillon Cube

Put water and bouillon cube in crock pot. Put your chicken in, season with pepper, garlic and a light sprinkle of salt. Top with Salsa. Cover and crock for 4-6 hours on low~I typically use frozen chicken breast to get the most time out of it.

This is what it looks like shredded and ready for whatever you choose. You can freeze in ziplocs at this point and defrost as needed.

Tuesday, April 27, 2010

Tuna Puffs

For my close friends, Tuna Puffs are a tradition at parties, get togethers or just because. They are "expected" and requested at any adult event I host. What you probably didn't know is that I fell in love with Tuna Puffs when I was 5 years old. My Aunt served these at her wedding reception, her Mother-In-Law made them. My Aunt continued to make them randomly over the years and I was excited whenever I saw them on her buffet table.

I made them the first time myself in 10th grade and brought them to a danceline get together and once again, they were expected at every event after. Do the math, I've made a LOT of puffs over the years, even at my young age;) I ran into an old dancing buddy a couple of years ago and she actually asked for the recipe so I guess I left an impression.

They used to intimidate me, the whole making the puff part. Melt the butter and water, add flour, STIR quickly before it clumps, by god, STIR quickly before it clumps. I've since realized that yes you need to stir, and yes it needs to be fairly quick but it rarely clumps, even if you slack. So relax and start your dough.

The second part that used to SUCK and make my arm hurt, was stirring the eggs in. One at a time, incorporate the egg were the directions. It was slimy, it was messy, it was time CONSUMING and oh, my aching arm. Maybe I should have kept the hand beating in...my bingo wings wouldn't be flapping quite as fast. BUT, since I didn't continue to hand beat, I did the cardinal sin apparently of making puff pastry and used the hand mixer..gasp. Ahhh, life was easier, I didn't hate making the pastry dough and you know what, I had a chef ask me how I got my dough so light. I just smiled and gave my bingo wings a pat, I only let me dear blogging friends in on my secrets;)

Stuffing the puff. I use tuna in oil...I know, I know, the horror of it all. But tuna in oil gives the puffs better flavor. Furthermore, you HAVE to use onion. You can mince it up in pieces you cannot see but you need the onion, I promise, even my onion hating relatives don't notice the onion in there. I have had them with egg salad and chicken salad...not so much. Not enough flavor in my opinion but if you want to try that, let me know if you liked it.

You can cut the puffs in half and literally make little sandwiches or you can impress your friends and use either a pastry bag or a ziploc to fill them up. The tiny hole you have to push the tuna in, makes the whole experience less messy. BUT and this is a BIG but...make sure you label them the first time you make them, don't want people thinking they are baby cream puffs. The face you get when a newbie tries one and is expecting sweet and gets tuna, not a pretty one.

Let's get started.

Preheat oven to 400 degrees..I don't preheat for much, but with these a hot oven works best.

Puffs
1 C Water
1 stick Butter
1 C Flour
4 room temperature Eggs~if you forgot to take these out, no worries, cold eggs work ok too

Melt your butter and water in a small pot. When it comes to a boil, turn off the heat and immediately stir in the flour, it will form a ball. Cool for about 10 minutes. Crack 2 eggs into dough and mix with your hand mixer, when those are mixed in, add your other two. Whip it up until you get a sticky dough. Take a spoon out of your silverware drawer and get a small clump of dough, about the size of a small 25 cent gumball. Put on a non stick cookie sheet. The dough puffs up, not too much to the side, so just leave a bit of room. Put in the oven for about 20 minutes. Here is where so many go wrong and get mushy puffs. LEAVE them in the oven until they are fully golden brown. There should be NO bubbles on them. They should be dry, completely dry. Better to overcook then to under cook, that I promise. Remove from pan to cool and repeat. I have a large cookie sheet that I fill up twice, makes about 70 puffs. You can do this a day ahead of time if you need to or even weeks before and freeze them, defrost and stuff (although anyone who knows me, knows that I like things freshly prepared so I have personally never frozen them)

Stuffing

4 cans Tuna in Oil
2 T minced dried Onion or chop up some fresh
1/2 t Pepper
Miracle Whip

Drain tuna, break it up with your fingers. You want to make sure you don't have any big chunks. Add onion and pepper, give it a stir. Add Miracle Whip. I'm guessing here but I'd say about 1/4-1/3 C per can. You want it sloppy, not crazy sloppy but too sloppy for a sandwich. If you want to use less that works too. Chill for an hour or so to let the onion and tuna meld together.

Fill your pastry bag without tip, poke a hole with your finger into cooled puff, insert pastry bag and squeeze until puff is full. Continue 70 more times. Chill for at least a couple of hours, not more than 24 and serve. You can eat them 24 hours later, they just don't taste as fresh.
If you cut your butter up, the process goes that much faster.
This is after you've mixed in your flour. See the nice ball of dough it forms.
Add a couple of eggs and use your hand mixer to beat these babies in OR give your bingo wings a workout and stir by hand.
This is what the dough looks like. Nice and creamy.
Grab a spoon and grab some dough.
Side view
Pan ready for the oven.
Dry, golden brown, DONE.
Your tuna, I'm short a can but I'm using the leftover puffs and squirting whipped cream out of the can into them, freezing them and giving them to my kids for dessert with hot fudge on top.
Drain your tuna by squeezing the top down.
Break the tuna up so there are no big clumps, add onion and pepper.
Add Miracle Whip and chill for at least an hour.
Disposable pastry bags are my friend. If you don't have one, you can use a ziploc, and clip off a small corner or cut the puffs in half and make a little sandwich.
Poke a hole in the puff like this.
Here's the hole to stuff.
Insert pastry bag and give a gentle squeeze.
Pop in your mouth and enjoy or put in the fridge to chill a bit. You'll be asked to make them again, I promise.

Saturday, April 24, 2010

5K

In addition to playing hockey, baseball, soccer and doing a triathlon every year, my son Max also runs a couple of 5K races every year. I should further note, that he would play more sports or on multiple teams if "I" allowed it. I restrict to one sport per season..a rule he wouldn't choose but understands. To say the kid amazes me would be a HUGE understatement.

He ran his first 5K four years ago and the competitive side of him liked that it was timed so he could keep track of his progress over the years. He doesn't train, he simply has me sign him up and he goes. It really shouldn't surprise me, the kid hasn't stopped moving since he figured out how to crawl. He EXHAUSTED me as a toddler, so full of energy and life that he was hard to contain. A natural competitor who enjoys a challenge. I wish I had a 10th of his energy.

The bonus of these 5Ks and living in Minnesota is that it's hardly ever nice weather in the races he runs. Today did not disappoint, it was pouring rain and about 50 degrees. That beats the snow and 30 MPH wind a couple of years ago though.

He was smiling when he finished, his cheering squad..aka me, was freezing her wet, soggy butt off but smiling and yelling for him as he crossed the finish line. Every time he finishes a race I get teary, my baby is growing up, I am catching a glimpse of him as a man..he looks at me and gives me that look that only your kid can give you...the combination look of "ahhh Mom it's ok and what the heck are you teary for" and then says, "where's the food"? Thanks for my moment buddy;)

Official times will not be posted for 24 hours but today he finished with an unofficial IPOD time of 27.59, beating last years time by a full minute. WOO HOO MAX...You are AMAZING and I love you!!
Here he is waiting for the starting horn...I completely spaced taking a photo at the end like I usually do because I was soaked from my toes to my head.

Wednesday, April 21, 2010

Pesto Pasta

This is so painfully easy that I hate to post it because I've gotten many compliments over the years. But since I've been sharing all my little secrets on here, guess you get this one too.

Interesting little piece of information too...my son, the non pasta loving kid who doesn't like anything green, liked it...until I added the cheese. Oh well, can't win them all and next time I'll take some out before I add the cheese.

The bonus of this recipe. It tastes good freshly mixed up, it tastes good right out of the fridge and it tastes good at room temperature. That's MY kind of recipe. I hope you like it.

What you will need
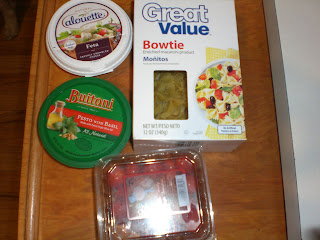
Box of Bowtie Pasta
2 Chicken or Vegi Bouillon Cubes
7 oz Container of Refrigerator Pesto Sauce ~ I've used the jar and it wasn't good
4 oz Container of Feta
Container of Grape or Baby Tomatoes
Chopped cooked Chicken ~ Optional

Cook your pasta in water that you've dropped a couple of bouillon cubes in. Drain and toss with Pesto sauce. Add tomatoes, chicken and couple cranks of pepper, toss again. Add cheese and toss once last time. Serve.
Your ingredients
Chop your cooked chicken. This was left over salsa chicken but you can use anything or even rotisserie.
Drain your cooked pasta and mix in pesto sauce.
Add your chicken, tomatoes and a couple cranks of pepper.
Cheese goes in last.
Dinner is served.

Thursday, April 15, 2010

Green Beans

Green beans don't excite me much. I eat them because they are green and I know I should but I tried something a little different this time. Something I don't know why I didn't do before. My nephew said they were the best green beans he has ever eaten?? Super easy, so I thought I'd share.

1 lb fresh green beans
1 T butter
1 t Garlic Powder

Snap the ends off of your green beans. Bring a pot of water to a hard boil. Lots of bubbles going on. Throw your green beans in and cook for only about 3-5 minutes. I like a crunch and this is enough to just heat them through and leave that crunch. Drain. Add 1 t Garlic Powder, 1 T butter, toss and serve. If I had been making them for just "me", I would have added 1-2 T fresh Parmesan and tossed again but my family aren't big cheese people.
Toss them in the boiling water and give them a stir. Watch the bright green POP. Drain, toss with butter and garlic Powder...and some fresh Parmesan if you want to be really crazy.
Put in a pretty bowl and serve.

Wednesday, April 14, 2010

Chocolate Fondue

Want to know how to get your kids to eat fruit they normally turn their noses up at? Dip it in some chocolate. In case you were wondering, NO, I'm not above bribery.

We had a rare evening home, I mean home after school and for the ENTIRE evening...ahhhh, I forgot what those felt like. It was especially nice because it's been a long week at work for me and the kids had MCA testing. I decided to do something fun to shrug off the icky and bring on the yum. Chocolate Fondue is one of my favorite desserts and I happened to have just gone to the store so I had lots of stuff for dipping and all the ingredients. It was meant to be I tell you, chocolate fondue here we come.

3/4 C Whipping Cream
2 t Vanilla
1/2 C Semi Sweet Chocolate Chips
1 1/2 C Milk Chocolate Chips

Heat Whipping cream to a soft boil. That means when it starts to bubble, add your chips and 1/2 C at a time. Stir kind of in a zig zag so the chips don't clump up in a ball. Transfer the chocolate to a fondue pot or a small crock. Serve with cubed angel food cake, marshmallows, orange slices, pineapple, strawberries...anything you like dipped in chocolate.
Let's get the party started. Whipping cream and vanilla heating up. Bring to a soft bubbly boil.
Your chips
Liquid gold...um I mean chocolate.
MMMMM, can you taste it!! Pure heaven. The week just got so much better.

Friday, April 9, 2010

Snickerdoodles

This cookie has some memories for me. The boy I liked in 8th grade broke his leg. He told me his favorite cookies were Snickerdoodles, so I made him some and brought them over to his house. YES, I realize that is probably a strange thing for an 8th grade girl to do, but I have been baking forever and it's what we did when someone was hurt or sick. We brought them food. We took care of them and tried to do something to make them feel better.

I personally didn't care for the way they tasted but he claimed they were good?? That boy and I never made a good couple, were the cookies to blame?? I wasn't sure but I never made Snickerdoodles again.

Flash forward more years than you need to know about and my daughter wanted to bring cookies for her skating show buddies. Couldn't do anything with chocolate, can't have the girls getting messy faces or making their outfits dirty. Couldn't bring anything with a nut product because there could be a child near by that we could send into some kind of allergic fit. My traditional sugar cookies are too much work since I already had cupcakes and birthday cake on the agenda today SO that's how the Snickerdoodles were given another chance.

I remembered what I didn't like about Snickerdoodles the first time around...the taste. The texture was good but it had this taste, this funky flavor that I didn't care for. I have super sensitive taste buds and clearly my buds don't like cream of tartar since everything else is in any other cookie I like, so I decided to leave it out and add another teaspoon of baking powder.

The result...Max said, "Well I know what I want for my birthday" (he doesn't eat cake..yeah, I know..strange kid but we've established that his eating habits aren't normal.) I had to restrict the amount of cookies both he and his sister ate and I never have to do that. I also had to put the lid on the cookie jar and WALK away, something I don't have to typically do either. Yes, they were a hit and SO much easier than traditional sugar cookies. DANGER..yes, these cookies are straight up danger to the diet because you can't eat just one.

1 C Butter softened
2 Eggs
2 t Vanilla
2 3/4 C Flour
1/4 t Salt
2 T Baking Powder
1 1/2 C Sugar

Cinnamon/Sugar Mixture
1/2 C Sugar
1 T Cinnamon

Mix together in a bowl or ziploc.

Preheat oven to 375

Mix butter, eggs and vanilla. Add your dry ingredients and mix up (I did it with an old fashioned SPOON, no mixer today). You'll get a soft dough that kind of forms itself into a ball. Roll into balls, about the size of those quarter gum balls. Roll in cinnamon/sugar mixture. Put on ungreased cookie sheet and press down with your fingers or palm of your hand. Bake for 8-10 minutes. 8 minutes leaves them a bit softer with just the edges lightly browned and crunchy. 10 makes them a little crunchier with just a little soft...my personal favorite. Makes 5 dozen
Here is your butter, eggs and vanilla mixed together.
Add your dry and this is what you get. Kind of forms its own ball. I'm sure if you wanted to use a mixer, it would all be fine but why drag out extra stuff when a spoon does the trick.
Cinnamon and Sugar mixture. I was trying to be green and not use a ziploc. It would have made the job just a bit faster if I had. Just use a bowl that is big enough to either roll them or you to be able to grab and sprinkle because the whole ball needs to be covered.
Roll into balls about the size of those quarter gum balls.
Give them a good roll in the sugar mix.
Press them down with two fingers. Don't squish them, just press them down. Max thought I should use the palm of my hand so people wouldn't know I used my fingers..silly boy..who cares if I used my fingers?!? What he should have said, is that they look prettier. That I agreed with and ended up doing most of the cookies with my palm and not my fingers;)
See I didn't squish the life out of them.
They actually look like they could cook another minute or two but this is them at 8 minutes and they are cooked plenty. My kids preferred 8 over 10 minutes but they ate them either way without complaint.

Thursday, April 8, 2010

Lemon Muffins

I found a recipe for Lemon Bread on a baking website that I've been wanting to try. Bread is kind of hard to share with people at work so I decided to make the bread into muffins. I was a little worried because I had to poke the muffins and pour a syrup over them but it was all good. People at work LOVED them. I "liked" them, they felt like they were missing something. BUT I'm a tough sell on muffins because they aren't my favorite bread product. I would make them again just maybe with some blueberries next time.

1 1/2 C Flour
1 C Sugar
1 t Baking Powder
1/2 t Salt
2 Eggs
2/3 c Evaporated Milk
1/3 c Vegetable Oil
1 1/2 t grated lemon peel (about 1 lemon - reserve lemon for later use)

PREHEAT oven to 350°

Mix eggs, evaporated milk, oil and lemon zest together in medium bowl. Add flour, sugar, baking powder and salt. Stir until just combined. Pour into sprayed muffin tins about 3/4 full. Makes 12 muffins.

BAKE for about 20 minutes (if you want to make as a loaf of bread, I think the directions said to cook for about 50 minutes) or until wooden skewer inserted in center comes out clean. Using the skewer, poke numerous holes in the hot muffins, piercing all the way to the bottom, making what looks like a five dice on the top. Slowly drizzle the hot Lemon Syrup over the muffins, it was a little over under a Tablespoon per muffin. (Syrup will soak into the bread). Sprinkle with powdered sugar. Cool in pan for 15 minutes; Remove muffins to wire rack to cool completely.

LEMON SYRUP:
COMBINE 1/3 cup granulated sugar and 1/4 cup lemon juice (1 lemon or lemon juice) in small, heavy-duty saucepan. Cook over medium-low heat, stirring constantly, for about 5 minutes or until sugar is dissolved and a light syrup is formed.
Mix your eggs, milk and oil.
Add your dry ingredients and your zested peel. Remember not to go deep when you're zesting, meaning you don't want any of the white, just the yellow peel.
Spray your muffin pan well and fill with about 3/4 full, it uses all of the batter to make a dozen.
Kind of hard to see but I poked 5 holes that looked like a dice on top when they are fresh from the oven.
Here is the syrup you made with sugar and lemon juice. I'll be honest and tell you that I didn't stir constantly. I mixed it up and stirred occasionally until it came to a foamy boil.
Slowly pour a couple of spoonfuls over muffins trying to get into the holes. It's probably about a scant tablespoon for each muffin.
I sprinkled with powdered sugar just because I thought it made them look prettier. Cool for about 10-15 minutes. Remove from tins and cool on wire rack. Enjoy.

Saturday, April 3, 2010

Shrimp Sauce

I love having people over for dinner because I get to cook things that "I" like to eat. I get to make things a little fancier, a little spicier or I just get to make stuff that adults like to eat. Since I'm not much of a left over person, although I'm getting better..having dinner guests is the best thing ever because I can try new recipes and won't be eating it for a week after.

So, that brings me to the next 5 posts...If you've ever eaten at Benihana, I'm sure you've left there with some empty pockets and wishing you could make some of it at home. Well, I made my attempt the other night and the kids and my guests enjoyed it. My son who has NEVER in his life eaten a leftover, ate the leftover Teriyaki beef and rice with shrimp sauce.

The shrimp sauce, in our opinion, makes the meal. So, I've been looking for the recipe for years. Tried a few and they were ok but not spot on. This recipe is as close as I've found when I took out the extra salt. My kids were THRILLED. So, I'll start with my favorite and then post each part of the meal separately.

2 C Mayonnaise
1/2 C Water
2 t Sugar
1 T garlic juice ~ found by the spices
3/4 t Ketchup
1 t ground Ginger
1 t Hot Sauce
1 t dry Mustard
1 t Paprika
3/4 t White Pepper

Whisk together and chill.
Sorry, the photo is dark because when I took it with a flash, it was too white..can't win. It's a very light salmon color.
Here is a photo of all the meats and vegetables done and ready to serve. Follow the posts below to learn how to make this fun dinner or just pick and choose the ones you want to try, it's all good. AND, did I mention that all of the prep work can be done hours before so all you need to do is cook it up when you're ready. You'll need a few pans but if you have to or you can rinse and go. Start with the rice, when it's done, cover and move to the steak and chicken. You can cook those at the same time, I have faith, start your vegetables. Now, go to the shrimp. Take a deep breath and enjoy your dinner.

Zucchini and Onions

And, you've gotta have the vegetables. When my son saw me chopping up the onion he said, "Mom, you forgot to leave them in rings so you could do the volcano". I love that my son has that much confidence in me but had to remind him that I don't have a full size grill to make that happen at home.

You're gonna need
4 Zucchini sliced into strips
1 large Onion cut into rings and then cut into fourths
1 T Butter
1 t Garlic Powder
Sprinkle of Salt and Pepper

Get the pan hot, throw in your zucchini, let them sear a bit on the edges. Saute those around a minute or so. Add your onions and butter. Throw on your seasoning and stir the vegetables around until they are cooked through. Serve with shrimp sauce of course;)
Wash and cut the ends off of your zucchini.
Cut in half, then cut each half into three strips. Cut strips in half.
Peel and cut your onion in half. Cut into thin pieces.
This is what your onion should look like when you've got it all chopped up.
Get your pan HOT, throw in the zucchini, give it a bit of a saute, browning some of the edges.

SIDEBAR..The photo shows the onion in the pan right away. That was a mistake because the onion cooked faster and I wasn't thinking. So, do what I say and not what I do;)

Throw in the butter and the onions. Saute a couple of minutes and you're done.